Tuesday, November 30, 2010

Keep Margins Out of Link Lists

When building a menu or other list of links, it’s generally a good practice to use display: block; or display: inline-block; so that you can increase the size of the link target. The simple truth: bigger link targets are easier for people to click and lead to better user experience.

Let’s look at a simple list of links like this:

http://css-tricks.com/keep-margins-out-of-link-lists/

Wednesday, November 24, 2010

What is Cross Site Scripting or XSS ?


I think the name “cross site” is confusing. It’s easy to hear that and think it involves code on one website attacking code on another website. That’s not what it is. Not to mention its unfortunate “true” acronym.

It simply means: executing abritrary JavaScript code on the page.

This could be JavaScript that is inserted into the URL or through form submissions. If either of those ways of accepting information doesn’t “clean” the information it is getting before outputting it again on the page, then arbitrary JavaScript can run on that page and that’s an XSS vulnerability.

If JavaScript can run on the page, then it can access cookies.

If it can access cookies, then it can access active sessions.

If it can access active sessions, it can log in as you to websites you are logged in to, at least long enough to change passwords or other havoc.

Symantec has said that 80% of internet vulnerabilities are due to XSS.

Read More at : http://css-tricks.com/what-is-xss/

Sunday, November 21, 2010

The CSS Box Model


All HTML elements can be considered as boxes. In CSS, the term "box model" is used when talking about design and layout.

The CSS box model is essentially a box that wraps around HTML elements, and it consists of: margins, borders, padding, and the actual content.

The box model allows us to place a border around elements and space elements in relation to other elements.

The image below illustrates the box model:


Explanation of the different parts:

Margin - Clears an area around the border. The margin does not have a background color, it is completely transparent.

Border - A border that goes around the padding and content. The border is affected by the background color of the box

Padding - Clears an area around the content. The padding is affected by the background color of the box

Content - The content of the box, where text and images appear

In order to set the width and height of an element correctly in all browsers, you need to know how the box model works.

Read More at : http://w3schools.com/css/css_boxmodel.asp

Friday, November 19, 2010

50 Useful Coding Techniques (CSS Layouts, Visual Effects and Forms)


Although CSS is generally considered a simple and straightforward language, sometimes it requires creativity, skill and a bit of experimentation. The good news is that designers and developers worldwide often face similar problems and choose to share their insights and workarounds with the wider community.

This is where we come in. We are always looking to collect such articles for our posts so that we can deliver the most useful and relevant content to our readers. In this post, we present an overview of useful CSS/jQuery coding tips, tricks and techniques for visual effects, layouts and web form design to help you find solutions to the problems you are dealing with or will have to deal with in future.

You may want to look at similar CSS-related posts that we published last months:

Read More at : http://www.smashingmagazine.com/2010/02/18/50-css-and-javascript-techniques-for-layouts-forms-and-visual-effects/

Wednesday, November 17, 2010

Quick CSS Trick: Using Span to Break Up Words in URLS


How about breaking up the words in the URL with color? Check it out:
www.badgerfootballforums.com

I think that works pretty well, and it is something that can be achieved very easily with a little CSS:

a span { color: #971212; }

Then in your anchor link in your HTML just wrap the word you want colored in a span like so:

www.badgerfootballforums.com

To extend this concept a bit, how about the colors reverse themselves upon rollover? Like so:

Just do this in your CSS:

a { color: black;}
a span { color: #971212; }
a:hover { color: #971212; }
a:hover span { color: black; }

Source at : http://css-tricks.com/quick-css-trick-using-span-to-break-up-words-in-urls/

Tuesday, November 16, 2010

15 CSS Tricks Must be learned


As web designers and developers, we have all come to learn many css tricks and techniques that help us achieve our layout goals. The list of these techniques is an ever expanding one, however, there are certain tricks that are essential to achieve your goal. Today, we will review 20 excellent css techniques to keep in mind when developing your theme.

1. ABSOLUTE POSITIONING INSIDE A RELATIVE POSITIONED ELEMENT.

Putting an absolutely positioned element inside a relatively positioned element will result in the position being calculated on its nearest positioned ancestor. This is an excellent technique for getting an element to “stick” in a certain spot where you need it, for instance, a header badge.

2. Z-INDEX AND POSITIONING.

z-index can be somewhat of a mystery to developers. Often, you will find designers putting a very large z-index value on a div or element in order to try and get it to overlap another element. What we need to keep in mind, is that z-index only applies to elements that are given a “position” value. If you find an element will not adhere to a z-index rule you’ve applied, add “position:relative” or “position:absolute” to the troublesome div.

3. MARGIN AUTO

Using margin auto in a theme is a fantastic way to get an element centered on the screen without worrying about the users screen size. However, “margin: auto” will only work when a width is declared for the element. This also means to apply margin: auto to inline elements, the display first must be changed to block.

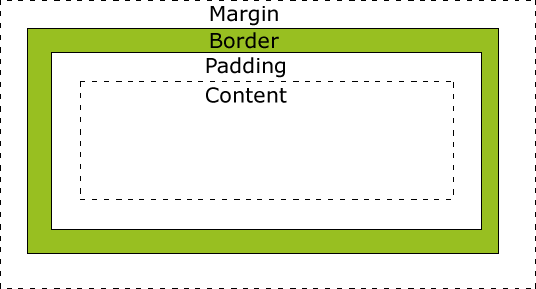
4. USE PADDING CAREFULLY AND APPROPRIATELY

One mistake I often made when starting off with css was using padding without knowing all the effects and the CSS Box Model. Keep in mind that according to the box model, padding adds to the overall width of the element. This can cause a lot of frustration with elements shifting out of place. For example:
#div { width:200px; padding: 30px; border:2px solid #000; }
Equals a total width of 264px (200 + 30 + 30 + 2 + 2). In addition, remember that padding, unlike margins, cannot contain negative values. 

5. HIDING TEXT USING TEXT-INDENT

Lets say you have an image you are using for your websites logo. This image will be inside an h1 tag, which is good for SEO, however, we also want to have our text title written in the h1 tags so the search engines can read it easily. Some may be tempted to use “display:none” on an element. Unfortunately, we would have to separate the image logo from the h1 tag if we used this technique. Using text-indent and negative values, we can get passed this like so.

h1 { text-indent:-9999px;/*Hide Text, keep for SEO*/ margin:0 auto; width:948px; background:transparent url("images/header.jpg") no-repeat scroll; }
This will ensure that all text is not visible on any resolution while allowing it stay inside the h1 element containing the logo. This also will not hide the text from screen readers as display none will.

6. IE DOUBLE FLOAT MARGIN BUGS

I’m sure we have all dealt with this one, as this is one of the most common css “hacks” we need to use. If you haven’t seen this bug before, basically, a floated element with a given margin suddenly has doubled the margin in IE 6 and has dropped out of position! Luckily, the fix is super simple. We just change the display of the floated element to “inline” as seen below.

.yourClass { float: left; width: 350px; margin: 20px 0 15px 100px; display: inline; }

This change will have no effect on any browsers since it is a float element, but for some reason in IE it fixes the double margin issue.

7. USING CSS TO FIGHT SPAM

This would be something you could include to really spice up your theme description. Alen Grakalic of CSS-Globe.com wrote a fantastic post on how to use css as a kind of CAPTCHA technique. A form is declared like so:

<label for="Name">Name:</label> <input type="text" name="name" /> <label class="captcha" for="captcha">Answer?</label> <input type="text" name="captcha" id="captcha" />

For the id “captcha”, we use a background image via css. This would require the spam scripts to find your html element, scan your css, compare selectors, find the certain selector and background image, and then read that background image. Its pretty safe to say most wont be able to do this. The downside is if someone is not surfing with css enabled, they wont know what to do.

8. PNG IN IE 6 FIXES

I’m sure we could all agree dealing with transparent png’s in IE 6 is a real headache. The fixes range from complex Javascript techniques to just using a Microsoft proprietary filter, to using conditional comments to swap them out for a .jpg. Keep in mind, all of these but the conditional comments rely on the Microsoft AlphaImageLoader.
filter: progid:DXImageTransform.Microsoft.AlphaImageLoader(...);
Read more on how to fix IE 6 PNG transparency:
SuperSleight Fix
Twin Helix Fix
Google’s IE 7.js

9. CSS CROSS BROWSER TRANSPARENCY

Believe it or not, it is pretty simple to get decent cross browser transparency using css. We can cover, IE, Firefox, Safari, Opera, and old browsers like Netscape Navigator. Chris Coyier recently came to our rescue again demonstrating these techniques.

.yourClass { filter:alpha(opacity=50);/*Needed for IE*/ -moz-opacity:0.5;/*Older mozilla broswers like NN*/ -khtml-opacity: 0.5;/*Old versions of Safari and "KHTML" browser engines*/ opacity: 0.5;/*FF, Safari, and Opera*/ }

This wont validate, but its not really an issue and the ThemeForest staff is pretty understanding when it comes to techniques like this.

10. USE CSS IMAGE SPRITES

CSS Image sprites are a fantastic way to load many of your css images at one time, in addition to reducing http requests and the file size of your theme. In addition, you wont have to deal with any images “flickering” on hover. CSS Image sprites are achieved by putting many of your image elements all into one image. We then use css to adjust the background position, width, and height to get the image where we want it.

11. USE CONDITIONAL COMMENTS TO SUPPORT IE 6

Far too often, web developers are forced to introduce new css rules and declarations that only apply to certain versions of IE. If your not familiar with a conditional comment, the code below would only link to a style sheet if the users browser is less than or equal to IE 7:

This code would go in the head section of your html file. If the css does not seem to be taking place in IE after you have linked to your specific style sheet, try getting more specific with your css selections to override default styles.

12. CSS SPECIFICITY

As mentioned above, CSS styles follow an order of specificity and point values to determine when styles override one another or take precedence. Nettuts recently had a nice article in which the point values for css were explained. They are like so:

Elements – 1 points
Classes – 10 points
Identifiers – 100 points
Inline Styling – 1000 points

When in doubt, get more specific with your style declarations. You can also use the !important declaration for debugging purposes if needed.

13.ACHIEVING A MINIMUM HEIGHT IN ALL BROWSERS.

When developing, we often realize we need an element to have at least a certain height, and then stretch to accommodate more content if needed. Unfortunately, IE doest recognize the min-height property correctly. Fortunately, we have what is known as the min-height fast hack, that goes like so:
#yourId { min-height:300px; height:auto !important; height:300px;/*Needs to match the min height pixels above*/ }

Simple, effective, and it validates just fine. This is also one of the few cases when the !important feature comes in great handy.

14. THE * HTML HACK

If you need or wish to avoid linking to IE specific style sheets, one can use the * html hack. In a perfect world, the HTML element will always be the root element, so any * before html would not apply. Nevertheless, IE treats this as a perfectly legitimate declaration. So if we needed to target a certain element in IE, we could do this:
* html body div#sideBar { display:inline; }

15. SLIDING DOORS TECHNIQUE

One major problem with using images for navigation buttons, is that you run the risk of the clients text being too long and extending past the button, or being cut off. Using two images and the css sliding doors technique, we can create buttons that will expand to fit the text inside. The idea behind this technique, is using two images for each button, and applying the images via a background declaration in CSS. For example:
HTML Markup: Your Title CSS: a.myButton { background: transparent url('right.png') no-repeat scroll top right; display: block; float: left; height: 32px; /* Image height */ margin-right: 6px; padding-right: 20px;/*Image Width*/ /*Other Styles*/ } a.myButton span { background: transparent url('button_left.png') no-repeat; display: block; line-height: 22px; /* Image Height */ padding: /*Change to how you see fit*/ }

Read More At : http://blog.themeforest.net/general/15-css-tricks-that-must-be-learned/

Friday, November 12, 2010

Masing effect with CSS


Show Image Under Text (with Acceptable Fallback)
SEE THE MASKING EFFECT WITH CSS, WITH OUT USING THE PHOTOSHOP

IT'S AWESOME !
Read More at : http://css-tricks.com/image-under-text/#comment-85296

Thursday, November 11, 2010

CSS Block Elements


HTML elements can be displayed either in block or inline style.

The difference between these is one of the most basic things you need to know in order to use CSS effectively.

The 3 ways that HTML elements can be displayed

All HTML elements are naturally displayed in one of the following ways:

Block
Takes up the full width available, with a new line before and after (display:block;)

Inline
Takes up only as much width as it needs, and does not force new lines (display:inline;)

Not displayed
Some tags, like <meta /> and <style> are not visible (display:none;)

Block example
<p> tags and <div> tags are naturally displayed block-style.

(I say "naturally" because you can override the display style by setting the CSS display property e.g. display:inline;.)

A block-display element will span the full width of the space available to it, and so will start on a new line in the flow of HTML. The flow will continue on a new line after the block-display element.

Here I’ve started a paragraph and now I’m going to insert a <div>

Read More at : http://www.webdesignfromscratch.com/html-css/css-block-and-inline/

Wednesday, November 10, 2010

CSS Breadcrumbs


Breadcrumbs is a term used to describe hierarchical links that tell the visitor where he/she currently is on your site. Visually breadcrumbs are just links with some sort of separator between them, such as a bullet image. This CSS code transforms ordinary looking links into a breadcrumb by giving each link a background image.

There are many different ways to implement breadcrumbs in CSS. Ideally the separator image should not even be part of the link, but dynamically inserted using CSS Generated content. However, since IE6 does not support generated content, that's not feasible at the moment. Then there's the debate over whether breadcrumbs should be implemented as a list, which I personally think is no more appropriate than just using regular <a> elements.

CSS Code :

<style type="text/css">

/*Credits: Dynamic Drive CSS Library */
/*URL: http://www.dynamicdrive.com/style/ */

.breadcrumb{
font: bold 14px "Lucida Grande", "Trebuchet MS", Verdana, Helvetica, sans-serif;
}

.breadcrumb a{
background: transparent url(media/breadcrumb.gif) no-repeat center right;
text-decoration: none;
padding-right: 18px; /*adjust bullet image padding*/
color: navy;
}

.breadcrumb a:visited, .breadcrumb a:active{
color: navy;
}

.breadcrumb a:hover{
text-decoration: underline;
}

</style>


HTML Code:

<p class="breadcrumb"><a href="http://www.dynamicdrive.com/">Dynamic Drive</a> <a href="http://www.dynamicdrive.com/style/">CSS</a> here</p>

<p class="breadcrumb"><a href="http://www.dynamicdrive.com/">Dynamic Drive</a> <a href="http://www.dynamicdrive.com/style/">CSS</a> <a href="http://www.dynamicdrive.com/style/csslibrary/category/C1/">Horizontal Menus</a> Here</p>

Exploring Markup for Breadcrumbs

What is the most appropriate possible markup for breadcrumbs? We’ll take a look at a bunch of different possibilities of various complexities and semantic success. Then also see what Google has to recommend as well as what HTML5 has in store for them.


Read more At : http://css-tricks.com/markup-for-breadcrumbs/

Thursday, November 4, 2010

Styling code blocks


In this article I'll explain how to use CSS for styling code blocks. Code blocks are generally formatted by using the pre element. Roger Johansson has proposed another way to accomplish this task and I'll follow his example with further improvements.

Table of contents

The markup


The proposed markup for code blocks is the following:
Listing 1. Proposed markup for code blocks

<ol class="code">
<li><code>/* static */</code></li>
...omission...
<li class="indent1"><code>gLexTableSetup = PR_TRUE;</code></li>
...omission...
<li class="indent2"><code>lt[i] |= IS_IDENT | START_IDENT;</code></li>
...omission...
<li class="indent3"><code>lt[i] |= IS_HEX_DIGIT;</code></li>
...omission...
<li id="last">...</li>
</ol>


Read More At : http://www.css-zibaldone.com/articles/code-blocks/styling.html

Tuesday, November 2, 2010

Replace An Image In The Header Text


As we know the Search engines like Google, Yahoo, MSN and Bing are looking for the text of the pages primarily to index them. We know that how to use the header tags <h1>. The <h1> header tags are important because search engines value organized sectioned content.

As the header <h1> is having default properties. But you dont want the big text for your headers on your site. So why dont you use your custom graphics. <h1> are very friendly to search engines, and you dont want to skip your <h1> for <img> tag, It will be loss of search engine friendlyness. so dont do it.

Read More at : http://varadesigns.com/webdesigning-tips/replace-Image-with-header-text.html

Monday, November 1, 2010

Block and Inline Level Elements


Nearly all HTML elements are either block or inline elements. The characteristics of block elements include:

1. Always begin on a new line
2. Height, line-height and top and bottom margins can be manipulated
3. Width defaults to 100% of their containing element, unless a width is specified

Examples of block elements include <div>, <p>, <h1>, <form>, <ul> and <li>. The characteristics of inline elements, on the other hand, are the opposite of block elements:

1. Begin on the same line
2. Height, line-height and top and bottom margins can't be changed
3. Width is as long as the text/image and can't be manipulated

Examples of inline elements include <span>, <a>, <label>, <input>, <img>, <strong> and <em>.

To change an element's status, you can use display: inline or display: block. But what's the point of changing an element from being block to inline, or vice-versa? Well, at first it may seem like you might hardly ever use this trick, but in actual fact, this is a very powerful technique, which you can use whenever you want to:

1. Have an inline element start on a new line
2. Have a block element start on the same line
3. Control the width of an inline element (particularly useful for navigation links)
4. Manipulate the height of an inline element
5. Set a background colour as wide as the text for block elements, without having to specify a width

Read More at : http://articles.sitepoint.com/article/top-ten-css-tricks