Sunday, December 26, 2010

How To Change Your Iframe Settings With Css

How to change your <iframe>'s settings.
It's very simple, you just have to put these settings in your css code between the <head></head> tags. btw. most of these settings can be used in <div> tags too.

Borders

No border at all
iframe { border:0px; }

Dashed border
iframe { border-style:dashed;
border-color: #000; /*CHOOSE THE COLOR YOU WANT HERE */
border-top-width:1px; /*CHOOSE THE SIZE YOU WANT HERE */
border-bottom-width:1px; /*CHOOSE THE SIZE YOU WANT HERE */
border-left-width:1px; /*CHOOSE THE SIZE YOU WANT HERE */
border-right-width:1px; /*CHOOSE THE SIZE YOU WANT HERE */
}

Dotted border

iframe {
border-style:dotted;
border-color: #000; /*CHOOSE THE COLOR YOU WANT HERE */
border-top-width:1px; /*CHOOSE THE SIZE YOU WANT HERE */
border-bottom-width:1px; /*CHOOSE THE SIZE YOU WANT HERE */
border-left-width:1px; /*CHOOSE THE SIZE YOU WANT HERE */
border-right-width:1px; /*CHOOSE THE SIZE YOU WANT HERE */
}
Unfortunately, these 'tricks' described above are supported by opera or mozilla firefox only.

Appearently the 'microsoft internet people' doesn't care much about css.

Absolute / Relative

Absolute

If we use it outside of a <div>, we should set as below.

iframe {
position:absolute;
top: 25px; /* 25 pixels from the top of the web-page. */
left:350px; /* 350 pixels from the left of the web-page. */
}

Relative

However if we use it inside of a <div>:
iframe {
position:relative;
top: 25px; /* 25 pixels from the top of the <div> tag. */
left:350px; /* 350 pixels from the left of the <div> tag. */
}
Size

Scrollbars
iframe {
position:absolute;
top: 25px; /* 25 pixels from the top of the <div> tag. */
left:350px; /* 350 pixels from the left of the <div> tag. */
height: 500px;
width: 500px;
overflow: scroll; /* if the content inside of the <iframe> is bigger than its size, scrollbars are added.*/
}

Auto-size

iframe {
position:absolute;
top: 25px; /* 25 pixels from the top of the <div> tag. */
left:350px; /* 350 pixels from the left of the <div> tag. */
height: auto; /* in this case, we get rid of the overflow setting, because the height of the iframe is increased by itself.*/
width: 500px;
}
Note: 'auto' as size, works the same for the WIDTH setting.

Transparent Background

Note: this 'trick' only works on mozilla firefox. But is pretty simple anyway.
iframe { background:transparent; }

Multi-IFrame

And last but not least, if you use more than one iframe in your page, you could use different settings for each one. like this:
#one {
border-style:dashed;
border-color: #000; /*CHOOSE THE COLOR YOU WANT HERE */
border-top-width:1px; /*CHOOSE THE SIZE YOU WANT HERE */
border-bottom-width:1px; /*CHOOSE THE SIZE YOU WANT HERE */
border-left-width:1px; /*CHOOSE THE SIZE YOU WANT HERE */
border-right-width:1px; /*CHOOSE THE SIZE YOU WANT HERE */
}

#two {
border-style:dotted;
border-color: #000; /*CHOOSE THE COLOR YOU WANT HERE */
border-top-width:1px; /*CHOOSE THE SIZE YOU WANT HERE */
border-bottom-width:1px; /*CHOOSE THE SIZE YOU WANT HERE */
border-left-width:1px; /*CHOOSE THE SIZE YOU WANT HERE */
border-right-width:1px; /*CHOOSE THE SIZE YOU WANT HERE */
}
-------------------------------------------------

<iframe src="/img_articles/4798/1.htm" id="one"></iframe>
<iframe src="/img_articles/4798/2.htm" id="two"></iframe>

Read more: http://www.webdesign.org/html-and-css/tutorials/how-to-change-your-iframe-settings-with-css.4798.html#ixzz19Hwc71fo
Wednesday, December 22, 2010

SEO Friendly CSS Hiding


#hider {
position: absolute;
left: -555px;
}

Thursday, December 9, 2010

6 KEYS TO UNDERSTANDING MODERN CSS-BASED LAYOUTS


Much of CSS is pretty straightforward and, I suspect, quite easy for most people to grasp. There's font styles, margin, padding, color and what not. But there's a wall that people will run into... that point where a number of key elements need to come together to create a solid CSS-based layout that is consistent cross-browser.

These are the six things that will help people get over the hump.

Box Model

At the very core of it, is an understanding of the box model within CSS. Sure, you may know your margin and padding but what happens when elements start to interact with each other. Suddenly things that look good in one browser go all to hell in the other. Consistently in working with the box model comes from understanding the difference between quirks mode and strict mode. It's also a good idea to know how to hack it up for older browsers.

W3C CSS2.1 Spec
The Box Model
Tantek's Box model hack
Quirks mode and strict mode
Activating the Right Layout Mode Using the Doctype Declaration

Floated Columns

While absolute positioning was one of the first approaches that people took when attempting to replace table-based layouts, it was floating content that opened the doors of possibility. Along with learning how to float, you must also learn how to clear floats so that content that follows or backgrounds will appear correctly.

Floatorial
Clearing floats
Faux Columns
Creating Liquid Faux Columns

Sizing Using Ems

There are two different issues at play here when it comes to sizing with ems: fonts and layouts.

With fonts, Internet Explorer 6 and lower don't allow you to resize the text when specified using pixels (px). Those with vision issues may wish to set their font size larger in order to more readily read what you've written. Specifying your font sizes using ems has proven to be the popular approach to this problem. The importance of sizing text using ems is waning as users move on to better browsers.

Sizing layouts with ems can also offer up a whole other avenue of flexibility. When playing with text size, it can often throw an entire design out of whack. Styling elements using ems allow the containers of content to grow along with the text, maintaining the consistency of the design.

How to size text using ems
Elastic Design
Fixed or fluid width? Elastic!

Source : http://snook.ca/archives/html_and_css/six_keys_to_understanding_css_layouts/

Saturday, December 4, 2010

11 Classic CSS Techniques Made Simple with CSS3

We’ve all had to achieve some effect that required an extra handful of divs or PNGs. We shouldn’t be limited to these old techniques when there’s a new age coming. This new age includes the use of CSS3. In today’s tutorial, I’ll show you eleven different time-consuming effects that can be achieved quite easily with CSS3.

CSS3? What’s that?!

I’m sure you’ve heard of CSS in general. CSS3 isn’t that much different, in terms of syntax; however, the power of CSS3 is much greater. As you’ll see in these eleven techniques, you can have multiple backgrounds, dynamically resize those backgrounds, border radiuses, text shadows, and more!

Here’s what the official (or at least, what I consider official) website of CSS3, css3.info, has to say about CSS3:

What We’ll Be Covering

Here are the 11 techniques that I’ll be showing you how to recreate with CSS3. I’ll show you how to create them using CSS2 (or JavaScript), and then with CSS3 properties. Remember – these effects will only work in modern browsers that implement these CSS3 features. Your best option is to view these with Safari 4.

1. Rounded Corners
2. Box Shadow
3. Text Shadow
4. Fancy Font
5. Opacity
6. RGBA
7. Background Size
8. Multiple Backgrounds
9. Columns
10. Border Image
11. Animations

Source : http://net.tutsplus.com/tutorials/html-css-techniques/11-classic-css-techniques-made-simple-with-css3/

The Difference Between ID and Class

ID's are unique
* Each element can have only one ID
* Each page can have only one element with that ID

When I was first learning this stuff, I heard over and over that you should only use ID's once, but you can use classes over and over. It basically went in one ear and out the other because it sounded more like a good "rule of thumb" to me rather than something extremely important. If you are purely an HTML/CSS person, this attitude can persist because to you, they really don't seem to do anything different.

Here is one: your code will not pass validation if you use the same ID on more than one element. Validation should be important to all of us, so that alone is a big one. We'll go over more reasons for uniqueness as we go on.

Classes are NOT unique

* You can use the same class on multiple elements.
* You can use multiple classes on the same element.

Any styling information that needs to be applied to multiple objects on a page should be done with a class. Take for example a page with multiple "widgets":

Read more at : http://css-tricks.com/the-difference-between-id-and-class/

Thursday, December 2, 2010

CSS3 Slideup Boxes

Follow along as we use a few very simple CSS3 transitions to create a "slideup" box effect. Roll over the box with your mouse, and the title of the box slides out of the way and a more descriptive stylized box of information jockeys its way into place. This is supported in modern version of Gecko, WebKit, and Opera browsers. No Internet Explorer support yet, but no fallback is needed, the link works and the information shows as expected

VIEW DEMO

Source : http://css-tricks.com/video-screencasts/93-css3-slideup-boxes/

Tuesday, November 30, 2010

Keep Margins Out of Link Lists

When building a menu or other list of links, it’s generally a good practice to use display: block; or display: inline-block; so that you can increase the size of the link target. The simple truth: bigger link targets are easier for people to click and lead to better user experience.

Let’s look at a simple list of links like this:

http://css-tricks.com/keep-margins-out-of-link-lists/

Wednesday, November 24, 2010

What is Cross Site Scripting or XSS ?


I think the name “cross site” is confusing. It’s easy to hear that and think it involves code on one website attacking code on another website. That’s not what it is. Not to mention its unfortunate “true” acronym.

It simply means: executing abritrary JavaScript code on the page.

This could be JavaScript that is inserted into the URL or through form submissions. If either of those ways of accepting information doesn’t “clean” the information it is getting before outputting it again on the page, then arbitrary JavaScript can run on that page and that’s an XSS vulnerability.

If JavaScript can run on the page, then it can access cookies.

If it can access cookies, then it can access active sessions.

If it can access active sessions, it can log in as you to websites you are logged in to, at least long enough to change passwords or other havoc.

Symantec has said that 80% of internet vulnerabilities are due to XSS.

Read More at : http://css-tricks.com/what-is-xss/

Sunday, November 21, 2010

The CSS Box Model


All HTML elements can be considered as boxes. In CSS, the term "box model" is used when talking about design and layout.

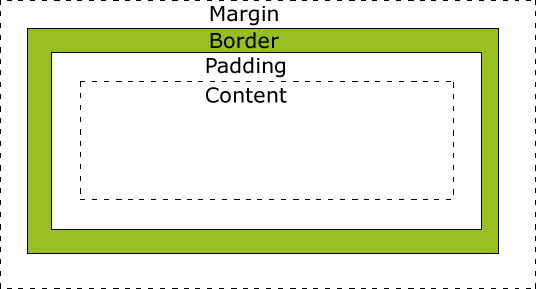
The CSS box model is essentially a box that wraps around HTML elements, and it consists of: margins, borders, padding, and the actual content.

The box model allows us to place a border around elements and space elements in relation to other elements.

The image below illustrates the box model:


Explanation of the different parts:

Margin - Clears an area around the border. The margin does not have a background color, it is completely transparent.

Border - A border that goes around the padding and content. The border is affected by the background color of the box

Padding - Clears an area around the content. The padding is affected by the background color of the box

Content - The content of the box, where text and images appear

In order to set the width and height of an element correctly in all browsers, you need to know how the box model works.

Read More at : http://w3schools.com/css/css_boxmodel.asp

Friday, November 19, 2010

50 Useful Coding Techniques (CSS Layouts, Visual Effects and Forms)


Although CSS is generally considered a simple and straightforward language, sometimes it requires creativity, skill and a bit of experimentation. The good news is that designers and developers worldwide often face similar problems and choose to share their insights and workarounds with the wider community.

This is where we come in. We are always looking to collect such articles for our posts so that we can deliver the most useful and relevant content to our readers. In this post, we present an overview of useful CSS/jQuery coding tips, tricks and techniques for visual effects, layouts and web form design to help you find solutions to the problems you are dealing with or will have to deal with in future.

You may want to look at similar CSS-related posts that we published last months:

Read More at : http://www.smashingmagazine.com/2010/02/18/50-css-and-javascript-techniques-for-layouts-forms-and-visual-effects/

Wednesday, November 17, 2010

Quick CSS Trick: Using Span to Break Up Words in URLS


How about breaking up the words in the URL with color? Check it out:
www.badgerfootballforums.com

I think that works pretty well, and it is something that can be achieved very easily with a little CSS:

a span { color: #971212; }

Then in your anchor link in your HTML just wrap the word you want colored in a span like so:

www.badgerfootballforums.com

To extend this concept a bit, how about the colors reverse themselves upon rollover? Like so:

Just do this in your CSS:

a { color: black;}
a span { color: #971212; }
a:hover { color: #971212; }
a:hover span { color: black; }

Source at : http://css-tricks.com/quick-css-trick-using-span-to-break-up-words-in-urls/

Tuesday, November 16, 2010

15 CSS Tricks Must be learned


As web designers and developers, we have all come to learn many css tricks and techniques that help us achieve our layout goals. The list of these techniques is an ever expanding one, however, there are certain tricks that are essential to achieve your goal. Today, we will review 20 excellent css techniques to keep in mind when developing your theme.

1. ABSOLUTE POSITIONING INSIDE A RELATIVE POSITIONED ELEMENT.

Putting an absolutely positioned element inside a relatively positioned element will result in the position being calculated on its nearest positioned ancestor. This is an excellent technique for getting an element to “stick” in a certain spot where you need it, for instance, a header badge.

2. Z-INDEX AND POSITIONING.

z-index can be somewhat of a mystery to developers. Often, you will find designers putting a very large z-index value on a div or element in order to try and get it to overlap another element. What we need to keep in mind, is that z-index only applies to elements that are given a “position” value. If you find an element will not adhere to a z-index rule you’ve applied, add “position:relative” or “position:absolute” to the troublesome div.

3. MARGIN AUTO

Using margin auto in a theme is a fantastic way to get an element centered on the screen without worrying about the users screen size. However, “margin: auto” will only work when a width is declared for the element. This also means to apply margin: auto to inline elements, the display first must be changed to block.

4. USE PADDING CAREFULLY AND APPROPRIATELY

One mistake I often made when starting off with css was using padding without knowing all the effects and the CSS Box Model. Keep in mind that according to the box model, padding adds to the overall width of the element. This can cause a lot of frustration with elements shifting out of place. For example:
#div { width:200px; padding: 30px; border:2px solid #000; }
Equals a total width of 264px (200 + 30 + 30 + 2 + 2). In addition, remember that padding, unlike margins, cannot contain negative values. 

5. HIDING TEXT USING TEXT-INDENT

Lets say you have an image you are using for your websites logo. This image will be inside an h1 tag, which is good for SEO, however, we also want to have our text title written in the h1 tags so the search engines can read it easily. Some may be tempted to use “display:none” on an element. Unfortunately, we would have to separate the image logo from the h1 tag if we used this technique. Using text-indent and negative values, we can get passed this like so.

h1 { text-indent:-9999px;/*Hide Text, keep for SEO*/ margin:0 auto; width:948px; background:transparent url("images/header.jpg") no-repeat scroll; }
This will ensure that all text is not visible on any resolution while allowing it stay inside the h1 element containing the logo. This also will not hide the text from screen readers as display none will.

6. IE DOUBLE FLOAT MARGIN BUGS

I’m sure we have all dealt with this one, as this is one of the most common css “hacks” we need to use. If you haven’t seen this bug before, basically, a floated element with a given margin suddenly has doubled the margin in IE 6 and has dropped out of position! Luckily, the fix is super simple. We just change the display of the floated element to “inline” as seen below.

.yourClass { float: left; width: 350px; margin: 20px 0 15px 100px; display: inline; }

This change will have no effect on any browsers since it is a float element, but for some reason in IE it fixes the double margin issue.

7. USING CSS TO FIGHT SPAM

This would be something you could include to really spice up your theme description. Alen Grakalic of CSS-Globe.com wrote a fantastic post on how to use css as a kind of CAPTCHA technique. A form is declared like so:

<label for="Name">Name:</label> <input type="text" name="name" /> <label class="captcha" for="captcha">Answer?</label> <input type="text" name="captcha" id="captcha" />

For the id “captcha”, we use a background image via css. This would require the spam scripts to find your html element, scan your css, compare selectors, find the certain selector and background image, and then read that background image. Its pretty safe to say most wont be able to do this. The downside is if someone is not surfing with css enabled, they wont know what to do.

8. PNG IN IE 6 FIXES

I’m sure we could all agree dealing with transparent png’s in IE 6 is a real headache. The fixes range from complex Javascript techniques to just using a Microsoft proprietary filter, to using conditional comments to swap them out for a .jpg. Keep in mind, all of these but the conditional comments rely on the Microsoft AlphaImageLoader.
filter: progid:DXImageTransform.Microsoft.AlphaImageLoader(...);
Read more on how to fix IE 6 PNG transparency:
SuperSleight Fix
Twin Helix Fix
Google’s IE 7.js

9. CSS CROSS BROWSER TRANSPARENCY

Believe it or not, it is pretty simple to get decent cross browser transparency using css. We can cover, IE, Firefox, Safari, Opera, and old browsers like Netscape Navigator. Chris Coyier recently came to our rescue again demonstrating these techniques.

.yourClass { filter:alpha(opacity=50);/*Needed for IE*/ -moz-opacity:0.5;/*Older mozilla broswers like NN*/ -khtml-opacity: 0.5;/*Old versions of Safari and "KHTML" browser engines*/ opacity: 0.5;/*FF, Safari, and Opera*/ }

This wont validate, but its not really an issue and the ThemeForest staff is pretty understanding when it comes to techniques like this.

10. USE CSS IMAGE SPRITES

CSS Image sprites are a fantastic way to load many of your css images at one time, in addition to reducing http requests and the file size of your theme. In addition, you wont have to deal with any images “flickering” on hover. CSS Image sprites are achieved by putting many of your image elements all into one image. We then use css to adjust the background position, width, and height to get the image where we want it.

11. USE CONDITIONAL COMMENTS TO SUPPORT IE 6

Far too often, web developers are forced to introduce new css rules and declarations that only apply to certain versions of IE. If your not familiar with a conditional comment, the code below would only link to a style sheet if the users browser is less than or equal to IE 7:

This code would go in the head section of your html file. If the css does not seem to be taking place in IE after you have linked to your specific style sheet, try getting more specific with your css selections to override default styles.

12. CSS SPECIFICITY

As mentioned above, CSS styles follow an order of specificity and point values to determine when styles override one another or take precedence. Nettuts recently had a nice article in which the point values for css were explained. They are like so:

Elements – 1 points
Classes – 10 points
Identifiers – 100 points
Inline Styling – 1000 points

When in doubt, get more specific with your style declarations. You can also use the !important declaration for debugging purposes if needed.

13.ACHIEVING A MINIMUM HEIGHT IN ALL BROWSERS.

When developing, we often realize we need an element to have at least a certain height, and then stretch to accommodate more content if needed. Unfortunately, IE doest recognize the min-height property correctly. Fortunately, we have what is known as the min-height fast hack, that goes like so:
#yourId { min-height:300px; height:auto !important; height:300px;/*Needs to match the min height pixels above*/ }

Simple, effective, and it validates just fine. This is also one of the few cases when the !important feature comes in great handy.

14. THE * HTML HACK

If you need or wish to avoid linking to IE specific style sheets, one can use the * html hack. In a perfect world, the HTML element will always be the root element, so any * before html would not apply. Nevertheless, IE treats this as a perfectly legitimate declaration. So if we needed to target a certain element in IE, we could do this:
* html body div#sideBar { display:inline; }

15. SLIDING DOORS TECHNIQUE

One major problem with using images for navigation buttons, is that you run the risk of the clients text being too long and extending past the button, or being cut off. Using two images and the css sliding doors technique, we can create buttons that will expand to fit the text inside. The idea behind this technique, is using two images for each button, and applying the images via a background declaration in CSS. For example:
HTML Markup: Your Title CSS: a.myButton { background: transparent url('right.png') no-repeat scroll top right; display: block; float: left; height: 32px; /* Image height */ margin-right: 6px; padding-right: 20px;/*Image Width*/ /*Other Styles*/ } a.myButton span { background: transparent url('button_left.png') no-repeat; display: block; line-height: 22px; /* Image Height */ padding: /*Change to how you see fit*/ }

Read More At : http://blog.themeforest.net/general/15-css-tricks-that-must-be-learned/

Friday, November 12, 2010

Masing effect with CSS


Show Image Under Text (with Acceptable Fallback)
SEE THE MASKING EFFECT WITH CSS, WITH OUT USING THE PHOTOSHOP

IT'S AWESOME !
Read More at : http://css-tricks.com/image-under-text/#comment-85296

Thursday, November 11, 2010

CSS Block Elements


HTML elements can be displayed either in block or inline style.

The difference between these is one of the most basic things you need to know in order to use CSS effectively.

The 3 ways that HTML elements can be displayed

All HTML elements are naturally displayed in one of the following ways:

Block
Takes up the full width available, with a new line before and after (display:block;)

Inline
Takes up only as much width as it needs, and does not force new lines (display:inline;)

Not displayed
Some tags, like <meta /> and <style> are not visible (display:none;)

Block example
<p> tags and <div> tags are naturally displayed block-style.

(I say "naturally" because you can override the display style by setting the CSS display property e.g. display:inline;.)

A block-display element will span the full width of the space available to it, and so will start on a new line in the flow of HTML. The flow will continue on a new line after the block-display element.

Here I’ve started a paragraph and now I’m going to insert a <div>

Read More at : http://www.webdesignfromscratch.com/html-css/css-block-and-inline/

Wednesday, November 10, 2010

CSS Breadcrumbs


Breadcrumbs is a term used to describe hierarchical links that tell the visitor where he/she currently is on your site. Visually breadcrumbs are just links with some sort of separator between them, such as a bullet image. This CSS code transforms ordinary looking links into a breadcrumb by giving each link a background image.

There are many different ways to implement breadcrumbs in CSS. Ideally the separator image should not even be part of the link, but dynamically inserted using CSS Generated content. However, since IE6 does not support generated content, that's not feasible at the moment. Then there's the debate over whether breadcrumbs should be implemented as a list, which I personally think is no more appropriate than just using regular <a> elements.

CSS Code :

<style type="text/css">

/*Credits: Dynamic Drive CSS Library */
/*URL: http://www.dynamicdrive.com/style/ */

.breadcrumb{
font: bold 14px "Lucida Grande", "Trebuchet MS", Verdana, Helvetica, sans-serif;
}

.breadcrumb a{
background: transparent url(media/breadcrumb.gif) no-repeat center right;
text-decoration: none;
padding-right: 18px; /*adjust bullet image padding*/
color: navy;
}

.breadcrumb a:visited, .breadcrumb a:active{
color: navy;
}

.breadcrumb a:hover{
text-decoration: underline;
}

</style>


HTML Code:

<p class="breadcrumb"><a href="http://www.dynamicdrive.com/">Dynamic Drive</a> <a href="http://www.dynamicdrive.com/style/">CSS</a> here</p>

<p class="breadcrumb"><a href="http://www.dynamicdrive.com/">Dynamic Drive</a> <a href="http://www.dynamicdrive.com/style/">CSS</a> <a href="http://www.dynamicdrive.com/style/csslibrary/category/C1/">Horizontal Menus</a> Here</p>

Exploring Markup for Breadcrumbs

What is the most appropriate possible markup for breadcrumbs? We’ll take a look at a bunch of different possibilities of various complexities and semantic success. Then also see what Google has to recommend as well as what HTML5 has in store for them.


Read more At : http://css-tricks.com/markup-for-breadcrumbs/

Thursday, November 4, 2010

Styling code blocks


In this article I'll explain how to use CSS for styling code blocks. Code blocks are generally formatted by using the pre element. Roger Johansson has proposed another way to accomplish this task and I'll follow his example with further improvements.

Table of contents

The markup


The proposed markup for code blocks is the following:
Listing 1. Proposed markup for code blocks

<ol class="code">
<li><code>/* static */</code></li>
...omission...
<li class="indent1"><code>gLexTableSetup = PR_TRUE;</code></li>
...omission...
<li class="indent2"><code>lt[i] |= IS_IDENT | START_IDENT;</code></li>
...omission...
<li class="indent3"><code>lt[i] |= IS_HEX_DIGIT;</code></li>
...omission...
<li id="last">...</li>
</ol>


Read More At : http://www.css-zibaldone.com/articles/code-blocks/styling.html

Tuesday, November 2, 2010

Replace An Image In The Header Text


As we know the Search engines like Google, Yahoo, MSN and Bing are looking for the text of the pages primarily to index them. We know that how to use the header tags <h1>. The <h1> header tags are important because search engines value organized sectioned content.

As the header <h1> is having default properties. But you dont want the big text for your headers on your site. So why dont you use your custom graphics. <h1> are very friendly to search engines, and you dont want to skip your <h1> for <img> tag, It will be loss of search engine friendlyness. so dont do it.

Read More at : http://varadesigns.com/webdesigning-tips/replace-Image-with-header-text.html

Monday, November 1, 2010

Block and Inline Level Elements


Nearly all HTML elements are either block or inline elements. The characteristics of block elements include:

1. Always begin on a new line
2. Height, line-height and top and bottom margins can be manipulated
3. Width defaults to 100% of their containing element, unless a width is specified

Examples of block elements include <div>, <p>, <h1>, <form>, <ul> and <li>. The characteristics of inline elements, on the other hand, are the opposite of block elements:

1. Begin on the same line
2. Height, line-height and top and bottom margins can't be changed
3. Width is as long as the text/image and can't be manipulated

Examples of inline elements include <span>, <a>, <label>, <input>, <img>, <strong> and <em>.

To change an element's status, you can use display: inline or display: block. But what's the point of changing an element from being block to inline, or vice-versa? Well, at first it may seem like you might hardly ever use this trick, but in actual fact, this is a very powerful technique, which you can use whenever you want to:

1. Have an inline element start on a new line
2. Have a block element start on the same line
3. Control the width of an inline element (particularly useful for navigation links)
4. Manipulate the height of an inline element
5. Set a background colour as wide as the text for block elements, without having to specify a width

Read More at : http://articles.sitepoint.com/article/top-ten-css-tricks

Sunday, October 31, 2010

5 Advanced CSS Pseudo Classes that will Save your Day

CSS3 provides powerful pseudo-classes that allow the designer to select multiple elements according to their positions in a document tree. Using these pseudo-classes can be a little confusing at first, but it becomes a lot easier over time to set up your layout.

In today’s article I’m going to take a look at 5 pseudo-classes that will simplify our design process and reduces a lot of time to create a certain visual effects. You will also find demonstration below each point to demonstrate how we can use these selectors in different design scenario you face everyday in your designing process.

1. The ‘nth-child’ Pseudo-selector

One of my favorite pseudo-selectors is the nth-child. This can be very useful if you are dealing with a Content Management System where you have no ability to change the server-side code to add classes into the markup.

How to use the nth-child

If you put simply a number in the parentheses, it will only affect the element associated with that number. For example, here is how to select only the 3rd element:
view plaincopy to clipboardprint?

1. ul li:nth-child(3) {
2. background-color: #333;
3. }


ul li:nth-child(3) {
background-color: #333;
}


Now let’s look at the table below for Pseudo-class Expressions, the first column of the table represents values for n, and the other columns display the results (for N) of various example expressions.
This pseudo-class matches elements on the basis of their positions within a parent element’s list of child elements. The pseudo-class accepts an argument, N, which can be a keyword or a number. The argument N can also be given as an+b, where a and b are integers (for example, 3n+1). For example, if the argument is 3, the third element will be selected.

Thus the expression 2n+1 will match the first, third, fifth, seventh, ninth, and so on, elements if they exist. This can be used to create alternated
  • background color.
    view plaincopy to clipboardprint?

    1. ul li:nth-child(2n+1) {
    2. background:#dfe6ec;
    3. color: #333;
    4. }


    Read More at : http://devsnippets.com/article/5-advanced-css-pseudo-class.html
  • Saturday, October 30, 2010

    CSS Specificity And Inheritance

    CSS’ barrier to entry is extremely low, mainly due to the nature of its syntax. Being clear and easy to understand, the syntax makes sense even to the inexperienced Web designer. It’s so simple, in fact, that you could style a simple CSS-based website within a few hours of learning it.


    But this apparent simplicity is deceitful. If after a few hours of work, your perfectly crafted website looks great in Safari, all hell might break loose if you haven’t taken the necessary measures to make it work in Internet Explorer. In a panic, you add hacks and filters where only a few tweaks or a different approach might do. Knowing how to deal with these issues comes with experience, with trial and error and with failing massively and then learning the correct way.

    Understanding a few often overlooked concepts is also important. The concepts may be hard to grasp and look boring at first, but understanding them and knowing how to take advantage of them is important.

    Two of these concepts are specificity and inheritance. Not very common words among Web designers, are they? Talking about border-radius and text-shadow is a lot more fun; but specificity and inheritance are fundamental concepts that any person who wants to be good at CSS should understand. They will help you create clean, maintainable and flexible style sheets. Let’s look at what they mean and how they work.

    The notion of a “cascade” is at the heart of CSS (just look at its name). It ultimately determines which properties will modify a given element. The cascade is tied to three main concepts: importance, specificity and source order. The cascade follows these three steps to determine which properties to assign to an element. By the end of this process, the cascade has assigned a weight to each rule, and this weight determines which rule takes precedence, when more than one applies.

    Please consider reading our previous related article:

    Read more at : http://www.smashingmagazine.com/2010/04/07/css-specificity-and-inheritance/

    Thursday, October 28, 2010

    CSS Parent Selectors


    Let’s be clear here, just in case someone is finding this from a search engine: there are no parent selectors in CSS, not even in CSS3. It is an interesting topic to talk about though, and some fresh talk has surfaced.

    a < img { border: none; }

    In this example, it would select a tags but only if they contained an img tag. (Aside: this would be a weird departure from the typical syntax where the actual elements being selected are on the right, this would be on the left).

    Read More At : http://css-tricks.com/parent-selectors-in-css/

    line break? break long links word-wrap ? It's possible!

    How to auto brake long links.
    I tried it today is very common using tinyurl etc.

    I really like the post. I tested below one works fine.

    * { word-wrap: break-word; }

    Tuesday, October 5, 2010

    Website Design - Using CSS


    Benefits of using cascading style sheets in website design.

    * Using CSS or cascading style sheet is a favorable way of designing web pages. CSS allows a web page designer better control of the layout and results in better look of the web pages. The best is to use external CSS included in the link which is placed in the head portion of the web page. With this link tag one can implement the style sheet to the whole site. And by editing one style sheet one can make desired changes on the site.
    * Every page should have the style sheet to implement CSS there. The link tag is used to connect external CSS style sheet in a Web page but the link tag also conveys relationship between the relational pages.
    * If the aim of the web designer is to create a Web page that appears as close as possible across whole set of web browsers, then first a master CSS style sheet is created to remove default browser styling. Thus when you build the website using master CSS style sheets, you'll be beginning with a clean palette. A good web designer knows how to link CSS with the web page HTML.
    * CSS makes it easy to add spaces around objects, next to elements, and inside your pages. CSS helps web designer in indenting, out denting, letter and word spacing, in line height and the white space. With CSS one can create a bulleted list on the web page.
    * CSS implementation is a great way to create framed pages without using frames - CSS allows you to position your HTML elements including making it look like a frame. It is also possible to create a background water mark image using CSS. It is easier to control H1, H2fonts and different font sizes using CSS. The web designer can make the fonts appear smaller or larger than what the font sizes actually are. CSS provides several properties for modifying your text so that your Web pages look more interesting. Text-decoration, text-transform, and text-shadow are useful properties to understand.
    * CSS helps in re-designing the HR tags used for dividing an HTML page. One can also stylize link or hyper link elements on a web page using CSS, like changing the hover color and visited color etc.

    More and more web designers are using CSS today effective web page designs.

    I am a freelance seo content writer and hence interested in web design and development. I write often on website design and search engine optimization. I have written this article to highlight the use of CSS in creating web sites.

    Article Source: http://EzineArticles.com/?expert=Uday_Patel

    CSS - The Basics


    Thinking about CSS, but want to learn what you need to know, or need to learn before jumping onto the CSS bandwagon? Let me begin by saying that CSS can reduce your time at the computer. But knowledge do you need to learn and is CSS compatible with the search engines and your browsers? These are some of the questions I'll try to answer,as well as, explain a little about what CSS is all about.

    What is CSS?

    CSS stands for Cascading Style Sheets. CSS is a set of formatting instructions that controls the looks of a web page or pages. Some of the browsers that support CSS is: (Firefox,IE3 or later, NN4 or later). You may be saying, great this will definitely save me some time. Not so fast, you also need to know that though, the majority of the browsers understand CSS, they do not fully support all of it's capabilities.

    XHTML - XHTML is EXtensible HyperText Markup Language. XHTML Is HTML with stricter rules-that adds conformity and, is 100% XML compliant. So you should be familiar with or become more comfortable with HTML, XHTML, and the style properties of CSS.

    What can you do with CSS

    You can build your layout,adjusting size and color of your headings or body text, as well as positioning your pictures. This translates into like pages being programmed once, without the choice of inputting the same coding into each of your web pages manually. Translated, elimination of duplicate formatting.

    How to get the Search Engines to See Your Copy

    It has been said that the Search Engines still have some problems with understanding CSS. But if you want to use CSS, is there a way to get the search engines to see what you want.

    1. Keep your text clean, if you have to much garbage in your web page, than the spiders will have a difficult time in determining what is relevant and what is not. Thus, CSS keeps your web page clean, without the redundant coding needed for each individual element of code. Here is an example of how to code a headline; with the CSS code below.

    Example: "h1"Title"/h1" (replace beginning and end quotes with )

    "CSS code: H1 {font family: Arial size: 18 px; bold;}" (leave off quotes)

    Syntax of CSS

    First, CSS can be written within any text editor. But the text file must be saved with a CSS extension.

    The syntax of CSS consists of the selector and the declaration. The selector is the identifier within the body of your web page; the declaration is the code that identifies the style that you want to put into place as to property and rule. Lets say you want all your H1 headlines to be green, with the font Arial. the code for CSS would be as follows:
    Note: Do not include quotes around the code.

    "selector {property: rule;}"

    "H1 {color: green; font-family: Arial;}"

    Note: Notice that the property and rule must be enclosed in {}.

    Placement of CSS

    There are three places to put your CSS code:

    In the Head (Internal), in an external file, or within an individual tag (Inline style).

    Internal -is used within a single web page that may have a unique style.

    Inline - mixes code with content. Sometimes you may need to use it, but this style does seem to eliminate the need of even using a CSS style sheet.

    External - The CSS is separate from the body of the web page and is linked with the web page. Thus, to link an external file into a web page you will need to use the link tag.
    Example: <link rel="stylesheet" type="text/css" href="NameofCSS.css"> (Goes in the head section after the title tag)

    Which way do you go? If you have a large site or a site that will be expanding, an external file would be a better way to quickly and easily manipulate all your web pages at once.

    Watch out for Spam

    But with anything on the Internet, CSS can be used for the good and the bad. And obviously, if you want to keep your site up and running for a long time, some CSS techniques should be avoided. Why? Because some CSS techniques can be considered spam by the search engines and thus, ban your site if you use the techniques. The blackhat tactics include such things as: 1) using CSS to hide text-from headlines to body from the human eye; 2) hiding and bolding or italicizing copy for search engine spiders benefit only.

    To conclude, CSS can and is a viable way to making your web pages easier to maintain-if the majority of your pages follow the same format. If you are not all that familiar with CSS, then take the time to look at w3schools.com tutorial. It's very informative and can get you started with CSS..

    Vickie J Scanlon -- Visit her site at: http://www.myaffiliateplace.biz for free tools, articles, ebooks, how to info, affiliate opportunities, travel and tech accessories, software and computers for the online business. Or check her blog – My Affiliate Place Blog (http://myaffiliateplace.blogspot.com/) .

    Article Source: http://EzineArticles.com/?expert=Vickie_Scanlon

    Thursday, September 30, 2010

    Gradient Borders with CSS


    An example for Gradient Border to a box. This example works work in Mozilla and Firefox browsers.


    Try with the below class property of the gradient border.

    .gBorder {
    border: 20px solid #000;
    -moz-border-top-colors: #555 #666 #777 #888 #999 #aaa #bbb #ccc;
    -moz-border-right-colors: #111 #222 #333 #444 #555 #666 #777 #888;
    -moz-border-bottom-colors: #111 #222 #333 #444 #555 #666 #777 #888;
    -moz-border-left-colors: #555 #666 #777 #888 #999 #aaa #bbb #ccc;
    width:400px;
    font-family:Verdana, Arial, Helvetica, sans-serif;
    font-size:.9em;
    padding:10px;
    }

    Tuesday, September 28, 2010

    create rounded corners with CSS!


    border-radius:

    Good news for designers, now onwords no need to use rounded corner images to get rounded effect to the

    boxes. The css3 border-radious property allows to easly utilise the rounded corners.

    Basic Example

    The following browsers support the rounded corners for Firefox, Safari/Chrome, Opera and IE9.
    The css property for this example is, quite simple:

    #bor1 {
    border-radius: 15px;
    }

    To support Firefox browser, need to use the -moz- prefix

    #bor1 {
    -moz-border-radius: 15px;
    border-radius: 15px;
    }


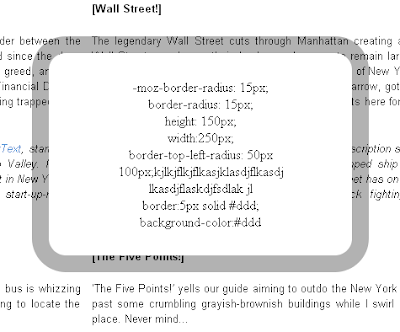
    <div
    style=" -moz-border-radius: 15px;
    border-radius: 15px;
    height: 150px;
    width:250px;
    border-top-left-radius: 50px 100px;
    border:5px solid #ddd;
    background-color:#ddd" >
    </div>


    How border-radius Works

    By using the four individual borders-radious properties

    1. border-bottom-left-radius
    2. border-bottom-right-radius
    3. border-top-left-radius
    4. border-top-right-radius


    Rounded corners can be created independently.


    <div
    style="height: 65px;
    width:160px;
    -moz-border-radius-bottomright: 50px;
    border-bottom-right-radius: 50px;
    background-color:#ddd">
    </div>


    <div style="
    height: 100px;
    width:250px;
    -moz-border-radius-bottomright: 50px 25px;
    border-bottom-right-radius: 50px 25px;
    background-color:#ddd >
    </div>


    <div
    style="height: 130px;
    width:250px;
    -moz-border-radius-bottomright: 25px 50px;
    border-bottom-right-radius: 25px 50px;
    background-color:#ddd" >
    </div>


    <div style=" height: 100px;
    width:250px;
    -moz-border-radius: 1em 4em 1em 4em;
    border-radius: 1em 4em 1em 4em;
    background-color:#ddd" >
    </div>


    <div style="height: 130px;
    width:250px;
    -moz-border-radius: 25px 10px / 10px 25px;
    border-radius: 25px 10px / 10px 25px;
    background-color:#ddd" >
    </div>


    <div style=" height: 100px;
    width:250px;
    -moz-border-radius: 350px;
    border-radius: 35px;
    background-color:#ddd" >
    </div>


    Monday, September 27, 2010

    CSS3 Shadow Effect


    Shadow effects are specified based on specified order. The property dont increase the size of the box, though they can extend past its boundaries.


    .shadow {
    text-shadow: 5px 5px 5px #a1a1a1;
    font-size:3em;
    color:#000;
    font-family:"Times New Roman", Times, serif
    }


    The above class specifies text shadow effect, it extends 5px to the right and 5px below the text, and the 5px blur.

    Browser Support

    IE8 - None
    FF3.5+ - Yes
    SA1.3+ - Yes
    OP9.5+ - Yes

    shadow value must specify a shadow offset and a blur radius and color.

    Using two lenghth values the offset will specified.

    * First value represents the horizontal distance to the right of the text in positive.
    The negative value move the text to left side.

    * Second value represents the vertical distance below the text (if it’s positive) or above the text (if it’s negative).

    The blur radius is specified after the offset values; it’s a length value that represents the size of the blur effect. If no radius is specified, the shadow will not be blurred.

    Color can be specified before or after the offset and blur radius values.

    The Most Exciting Aspects of CSS3

    CSS3 is the new CSS kid on the block currently being drafted up by W3C. Here I list some of the most important changes I think will have the most impact on the future of web development!

    1) The box-shadow property

    Top of my list and many others, is the box-shadow property. This property will allow the developer to add a drop shadow effect to an element. Simply by specifying a colour of your choice, the horizontal offset which defines how much to the left or right you want the shadow, the vertical offset which defines how far up or down you want the shadow, and a blur radius which defines how deep or sharp you want the shadow to be. The great thing about this effect is that as it is rendered by the browser and not pre-rendered in an image Therefore it can be used on elements which are animated using jquery - the shadow is animated to!

    2) The Border-radius property

    This property is fantastic as it allows you to finally give your elements rounded corners. Simply provide a numeric measurement to define how large you want the radius to be. Each corner of an element can be individually defined. The rounded corners should also be reflected in the drop shadow if one is specified.

    3) Web Fonts with @font-face

    This is not strictly a CSS3 implementation I will admit as @font-face was already part of CSS2. However the exciting part is that developers will be able to specify OpenType and TrueType fonts for use in their websites instead of being restricted to Embedded OpenTypes. To do this you would refer to a font of your choice hosted on the internet (you can search for great resources by googling 'font face fonts'). You can then use these fonts anywhere else in your CSS font-family styles. This finally opens the door and gives a breath of fresh air to the typography of the internet.

    4) The text-shadow property

    One of my favourite new options is the text-shadow property. This works much like the box-shadow property as you provide a colour, two offsets and a radius. Like a lot of effects I would recommend being very subtle with this to achieve maximum impact. Using this with web fonts lends a lot of power to CSS without the need for photoshop.

    5) background colour gradients

    Specifiying gradient background effects for elements is again, very beneficial. This is another area where photoshop can now be bypassed in a lot of situations and hence improving your website size. You can specify a left to right, right to left, top to bottom, bottom to top or radial gradients to fill the background of an element, from one colour to another. Again, being subtle with effects like this is key for maximum impact.

    6) The opacity property

    The ability to control the opacity of an element is probably one of the most anticipated and widely used effect used today, where possible. by providing a number between 0 and 1 or a percentage, you can control how 'translucent' you wish your element, and its children, to be. The effect being you can see the elements beneath it.

    CSS3 is an exciting and welcome development in the web development community. Using the above effects which are widely supported across the most recent, popular browsers, you'll be working more efficiently and effectively!

    The author of this article is a freelance web designer who provides professional Web Design in Kent.

    Article Source: http://EzineArticles.com/?expert=Nick_Bright

    Friday, September 24, 2010

    CSS Background Properties


    Using the css background properties we can define the background effects of an element.

    CSS background properties

    1. background-color
    2. background-image
    3. background-repeat
    4. background-attachment
    5. background-position

    Background Color

    This property specifies the color of the background of an element.

    body {background-color:#1ec7ff;}

    The body will fll with given background color #1ec7ff

    Background Image

    This property specifies an image of the background of an element.

    By specify the background image the image will spread the entire element

    Below it the background property

    body {background-image:url(desing.jpg);}


    I have taken a small image and applied to the background it spread entire body


    Background Image - Repeat

    1.Horizontally
    2.Vertically

    By default background-image property repeats an image both horizontally and vertically.
    In some cases we have to repeat the image only horizontally or vertically in that case:

    body
    {
    background-image:url('design.jpg');
    background-repeat:repeat-x;
    }


    background-repeat:repeat-x property is for repeat the image in x direction

    body
    {
    background-image:url('design.jpg');
    background-repeat:repeat-y;
    }


    background-repeat:repeat-y property is for repeat the image in y direction


    Background Image - no-repeat

    When we say background-image:no-repeat, it shows the image only once

    We can set the background position by specifing the background-position property

    body
    {
    background-image:url('design.jpg');
    background-repeat:no-repeat;
    background-position:right top
    }


    Instead of writing separately we can use short hand property.

    body {background:#ffffff url('desing.jpg') no-repeat right top"}

    Wednesday, September 22, 2010

    Using Blockquote


    Definition and Usage

    The <blockquote> tag defines a long quotation.

    Browser adds space before and after the blackquote element, and also add margins.

    Styling the blocquote element by adding css properties

    blockquote { padding: 10px; background: #eee; }


    When the blackquote is nested with multiple paragraphs, each paragraphs will not have breathing space. So we need to add some spacing after the blocks.

    blockquote, p { margin-bottom: 30px; border-bottom:1px solid #fff }

    I have used "border-bottom:1px solid #fff" property to the paragraph element for understanding clearly.

    Monday, September 20, 2010

    Transparent Borders with background-clip


    The Opacity declaration sets how opaque an element is. An opacity value of 1 means the element is fully opaque; an opacity value of 0 means an element is not at all opaque, i.e. fully transparent.


    Try with the below css code:

    background-color: white;

    -moz-background-clip: padding;
    -webkit-background-clip: padding;
    background-clip: padding-box;

    border: 20px solid rgba(205,131,25,0.3);

    -webkit-border-radius: 25px;
    -moz-border-radius: 25px;
    border-radius: 25px;

    padding: 25px;

    text-align: center;

    position: absolute;
    top: 50px;
    left: 500px;

    --------------

    The background-clip property is used to determine whether the backgrounds extends into the border or not.

    -moz-background-clip: padding; -> Firefox 3.6
    -webkit-background-clip: padding; -> Safari 4? Chrome 6?
    background-clip: padding-box; -> Firefox 4, Safari 5, Opera 10, IE 9

    The RGBA declaration allows you to set opacity (via the Alpha channel) as part of the color value.
    border: 20px solid rgba(205,131,25,0.3);

    Browser support :

    -webkit-border-radius: 25px;
    -moz-border-radius: 25px;
    border-radius: 25px;

    padding: 25px;
    text-align: center;
    position: absolute;
    top: 50px;
    left: 500px;

    Monday, September 6, 2010

    Thursday, September 2, 2010

    WebKit HTML5 Search Inputs

    One of the new types of inputs in HTML5 is search

    <input type=search name=s>
    It does absolutely nothing in most browsers. It just behaves like a text input. This isn’t a problem. The spec doesn’t require it to do anything special. WebKit browsers do treat it a bit differently though, primarily with styling.


    A search input in WebKit by default has an inset border, rounded corners, and strict typographic control.

    The Styling Limitations
    WebKit has big time restrictions on what you can change on a search input. I would guess the idea is consistency. In Safari particularly, search fields look just like the search box in the upper right of the browser. The following CSS will be ignored in WebKit “no matter what”, as in, you can’t even fight against it with !important rules.

    input[type=search] {
    padding: 30px; /* Overridden by padding: 1px; */
    font-family: Georgia; /* Overridden by font: -webkit-small-control; */
    border: 5px solid black; /* Overridden by border: 2px inset; */
    background: red; /* Overridden by background-color: white; */
    line-height: 3; /* Irrelevant, I guess */
    }

    In other words, be extremely cautious about using any of those CSS properties on a search input unless you are OK with the search input looking very different in other browsers.

    Allowed styling
    The following CSS works as expected. The last three, in my opinion, should probably locked in like the properties above as styling those properties almost always looks worse than if you didn’t.

    input[type=search] {
    color: red;
    text-align: right;
    cursor: pointer;
    display: block;
    width: 100%;
    letter-spacing: 4px;
    text-shadow: 0 0 2px black;
    word-spacing: 20px;
    }

    Busted styling
    Be careful not to use text-indent on search inputs. The results are quite weird an inconsistent. Here is one example.


    Sometimes the text is below like this. Sometimes it’s not visible at all. It appears to be related to elements around it as well as how much indent it has (low values sometimes work fine).

    Show Previous Searches

    This isn’t documented anywhere that I know of nor is it in the spec, but you if you add a results parameter on the input, WebKit will apply a little magnifying glass with a dropdown arrow showing previous results.

    <input type=search results=5 name=s>


    The integer value you give the results attribute is how many recent searches will appear in this dropdown, if there are that many.

    I really like the little magnifying glass. It drive home the searchyness of the field, but I’m calling the functionality itself rather janky. On a page reload recent searches clears, so that dropdown will almost always say “No recent searches”, unless you have implemented some kind of Ajax search (and even that I haven’t really tested).

    Size Restrictions
    There are only three different “sizes” that WebKit search inputs can be, and it is determined by the font-size you declare on them.

    Resulting Size CSS font-size
    Small <= 10px
    Medium 11px – 15px
    Large >= 16px


    Small, Medium, and Large. That’s all you get!

    This small, medium, and large business can be extremely frustrating, as even setting identical font values, at the minimum for a “bump”, you’ll see font size difference across browsers.


    Identical font sizings not idential.

    Notice the (x) on the right hand side of the search inputs on the WebKit side. That is an additional feature of these search inputs in WebKit. If the input has any value (not a placeholder, a real value) the (x) will be present which is a functional UI control for clearing the input.

    Speaking of placeholder text, search inputs are a great candiate for that.

    <input type=search results=5 placeholder=Search... name=s>

    And in case light gray isn’t your cup of tea, you can style the placeholder text:

    ::-webkit-input-placeholder {
    color: orangered;
    }

    Source : http://css-tricks.com/webkit-html5-search-inputs/

    Tuesday, August 31, 2010

    Nine Techniques for CSS Image Replacement

    The recent posting "Rethinking CSS Image Replacement" generated some pretty good discussion and got me thinking deeper about this issue. As a quick review, CSS image replacement is a technique of replacing a text page element with an image. An example of this would be including a logo on a page. You may want to use a «h1» tag and text for this for the accessibility and SEO benefits, but ideally you'd like to show your logo, not text.


    Read More at : http://css-tricks.com/css-image-replacement/

    Wednesday, August 25, 2010

    Multiple Borders

    The element needing multiple borders should have its own border and relative positioning.

    #borders {
    position: relative;
    border: 5px solid #f00;
    }

    The secondary border is added with a pseudo element. It is set with absolute positioning and inset with top/left/bottom/right values. This will also have a border and is kept beneath the content (preserving, for example, selectability of text and clickability of links) by giving it a negative z-index value.

    #borders:before {
    content: " ";
    position: absolute;
    z-index: -1;
    top: 5px;
    left: 5px;
    right: 5px;
    bottom: 5px;
    border: 5px solid #ffea00;
    }

    You can do a third border by using the :after pseudo class as well. Take special note that Firefox 3 (pre 3.6) screws this up by supporting :after and :before, but not allowing them to be absolutely positioned (so it looks weird).

    Ref URL : http://nicolasgallagher.com/multiple-backgrounds-and-borders-with-css2/

    Monday, August 23, 2010

    CSS Gallery

    Using a CSS gallery is a must these days. If you are a web designer then you know how important exposure is, especially on the web. Having your work displayed for millions to view everyday is essential. A CSS gallery can be instrumental in accomplishing this task. Let's face it, you want to get your name out there and the best way to do that is to have your site featured on a page that draws a lot of visitors to it. It's not brain surgery, but it's not for the faint of heart either. If you are an adventurous web designer who is ready to have your work displayed and commented on then it's high time that you give a CSS gallery a try. If you have always wanted to learn how to tap into the power of a CSS gallery, than this is the article for you to read.

    The thing to remember about any CSS gallery is that there are rules that you must abide by when posting your work. First you must make sure that your portfolio is free of errors. This means all the internal linking structures must be working, the graphic files must be included and linked properly and that your pages are structured correctly. This makes perfect sense, who wants to look at a site that has errors on it, what does that say about the designer who built the page. You don't want the hit to your reputation, take the time to make sure your site works perfectly before submitting. Most gallery owners won't post poorly constructed sites but there are a few that will still upload them. You want to be careful and double check before you hit that upload button.

    Second thing to remember when submitting your work to a CSS gallery is that your coding must be clean. People are going to be viewing your source code like crazy and you want to make sure your syntax is well phrased. No one likes to work with sloppy code. Think of your coding in this way, you want someone to be able to customize it for their needs if they were to buy it, right? Well who wants to buy a CSS site that has ugly code tossed in with uneven commenting lines and unclear formatting? CSS coding is just like writing a story. No one wants to read a badly written story either. Make your code a bestseller by writing it right from the beginning.

    Third item on this list for criteria of a CSS gallery is that you site must be WC3 validated. You've been in web development long enough to know that WC3 is the authority on web conformity and standards. With so many people all over the globe using web code these days is it any wonder why WC3 is looked at more than ever as the "seal of approval" for a fully functional and compatible web site? Remember that you're hoping all of these one-way links generated from a CSS gallery will convert into sales for you. If your site is WC3 validated this is one more selling feature of your work that will gain a buyer's trust and that's what builds consumer loyalty and recurring sales.

    As you can see a CSS gallery can be a web designer's best friend. It can help generate traffic for your site as well as introduce your work to the designing world in general. This article covered the necessary steps needed for portfolio submission to CSS galleries. We covered having error-free portfolios clean coding, and being WC3 compliant. With this information you are now ready to use any CSS gallery you wish.

    Article Source: http://EzineArticles.com/?expert=Elle_Wood

    Thursday, August 12, 2010

    Wednesday, August 4, 2010

    The Best Reasons For Using CSS Layouts

    In the culture of modern web design, Cascading Style Sheet or CSS has become a popular tool and trend nowadays. With the development of numerous, fast and modern web design applications, the use of tables were no longer effective and efficient as it used to be. Today, CSS is found by most web designers as more effective, efficient and acceptable in their growing industry of web design. Such advantages are as follows:

    • Consistency - With effective use of the "inheritance and cascading" features of CSS, a global style sheet can be used to affect style elements site-wide. If the situation arises that the styling of the elements should need to be changed or adjusted, these changes can be made easily, simply by editing a few rules in the global style sheet.

    • Accessibility - Most of CSS features are accessible to many websites accessibility standards in different countries and industries of the world like the government. It is also accessible to JavaScript which most websites use.

    • Reformatting Friendly - At CSS, a simple change of one line and a different style sheet can be used for the same page. This helps and provides the user the option to tailor a page or site to different target devices. Also, devices not able to understand the styling will still display the content.

    • Flexibility - CSS is so flexible that combining it with the functionality of Content Management System (CMS), you can program it into content submission forms. Hence, the contributor is able to select and submit in the same form the layout of an article or page he is submitting, though he is not familiar with or able to edit CSS or HTML codes.

    • Enhancement Friendly - With a clean CSS-layout, it's easier to optimize your website for mobile device such as iPhone; and in creating animation and effects, say with flash.

    • Printer Friendly - With the CSS media type "print", users can specify a style sheet that is only used when printing. This can be very useful and allows for neatly styled printouts that hide non-essential parts of the page and only contain the main content.

    • Modem Speed - In CSS, style sheets are used on multiple pages without being reloaded because they are usually stored in the browser cache. Therefore, the download speeds are increased and the data transfer over network is reduced.

    • SEO Friendly - CSS makes your website SEO friendly, thus boosts your search page ranking. Since search engines do not go through the bundles of HTML codes to get to the indexed codes, if you use external CSS files to design and determine the design attributes; the HTML code will be clean and it will result to better search engine rankings. In CSS, you could easily make the main content of your site to show up above the header or navigation menu in the code of your website; thus will help to show search engine crawlers the importance of your content. Because modern search engines such as Google, Yahoo and MSN love light-weighted websites. They want to see your content; the text, not the code. With CSS you practically externalize excessive code into external file, thus leaving the actual page clean and simple.

    Though the use of pure CSS alone meets a number of difficulties and drawbacks, yet it offers more than any other framework in the market today. Which framework you choose is really a personal decision. Different frameworks are better for different types of web designs, and for different designers. CSS being: SEO-reformatting-enhancement friendly; fast-loader, accessible, usable, flexible and consistent, can definitely give a boost to your business inwardly and outwardly.

    For your virtual assistant/outsourcing services needs in web design and management, visit us online at http://www.remoteworkmate.com/web-design-virtual-assistant/.

    Article Source: http://EzineArticles.com/?expert=Carla_Ramos_Loteria

    Tuesday, August 3, 2010

    ARIA and CSS Validation Errors at W3C

    If you are like me, you try very hard to produce W3C-valid XHTML and CSS code for your WordPress blog. I validate all of my XHTML and CSS code through the W3C Markup Validator Service and do my best to make sure it passes-in the green. However, sometimes there might be good reasons for accepting an error or two.

    WordPress developers are very often on the leading edge in producing blogs that are both attractive and usable. In order to do this, they may knowingly use code that will not pass validation at W3C. Coding for WAI-ARIA, the Web Accessibility Initiative for Accessible Rich Internet Applications suite, is a case in point.

    My blog theme is based on the WordPress default, Kubrick. I elected to allow comments on my blog. Because of this, ARIA-related code in the theme's comments.php file will generate XHTML code that will produce one validation error at W3C.

    CSS code that anticipates future acceptance by W3C can also cause validation errors. Even so, if a browser recognizes the code, the styling will be applied; otherwise, the styling will be ignored.

    Here is some CSS code in my theme's default style.css file that will generate errors at W3C:

    .wp-caption {

    -moz-border-radius: 3px;

    -khtml-border-radius: 3px;

    -webkit-border-radius: 3px;

    border-radius: 3px;

    }

    Such CSS code in a plugin's stylesheet can also cause validation errors. Sociable, a popular WordPress plugin, is an example of this. The settings for Sociable include a check box to use, or not to use, the plugin's stylesheet. Using the plugin's stylesheet will generate CSS validation errors at W3C. If you do not elect to use the stylesheet, Sociable arranges the social-bookmark icons in a list, and this configuration does not cause the validation errors. However, you just might prefer to use the plugin's styling even if some validation errors occur at W3C.

    When developers endeavor to maximize both the usability and the appearance of a WordPress blog, XHTML code can sometimes be generated that will show validation errors at W3C. Some of this code will, sooner or later, become part of the standard and pass "in the green" at W3C. The "offending" CSS and PHP code that causes the errors can be removed, but to do so might degrade the appearance or usability of the blog.

    I hope this short article helps you to understand why it might sometimes be acceptable to ignore some W3C validation errors.

    Here are the links for more information about WAI-ARIA and for the W3C markup validation Service:

    Source : http://ezinearticles.com/?ARIA-and-CSS-Validation-Errors-at-W3C&id=1826401

    Tuesday, July 27, 2010

    CSS - Maximum Benefits

    What is CSS?

    CSS is a simple file which controls the visual appearance of a Web page without compromising its structure. Using CSS we can control our font size, font color, link color and many other attributes on our web page. This will make our HTML code much more readable and the page size will be reduced.

    Why to use it and how to use it properly

    If you don't use CSS on your web pages and you have many tables and content on them, chances are that your HTML file size will be quite big. Fact is that we live in a busy world, and people are not will to wait more than 5 seconds web page to load.

    From the other side some web developers implement the CSS on wrong way. They write their CSS in HTML code of the page, like this:

    <html>

    <head>

    <title>My Page</title>

    <style>

    A

    {

    font-family: Verdana;

    font-size:8pt;

    color:black;

    text-decoration:none

    }

    </style>

    What is wrong with this technique? Well, imagine that you have site with more than 50 pages. One day, you decide that you want to change font color and colors of the links on your site. You will have to edit ALL the pages on your site, and do to that you will need time, because you place your CSS in your web page.

    Better way is to save your visual attributes in separate, external CSS file, and to link that file with your page like this:

    <html>

    <head>

    <title>My Page</title>

    <link href="myStyle.css" rel="stylesheet" type="text/css">

    Using this technique, you can change the look of your site within minutes, regardless of the number of pages, because your visual attributes are saved in ONE external CSS file. Edit that file, and you are done.

    Benefits

    Which are the benefits of using CSS? List is quite long and I will list here only the most important.

    * Your web page will load faster
    * Web page will become more search engine friendly
    * You can change you site appearance within minutes
    * You can write separate CSS file for handheld devices which will be called up instead of the regular CSS file
    * You can forget about creating printer friendly version of your site using separate CSS file when user chooses to print the web page.

    Avoiding standard HTML commands like:

    <font color="#0000ff"><font size=2>Product</font></font></font>

    will help us to reduce file size, but that is not the only benefit. Using CSS word product in this example will be moved more close on the top of the document. Search engine will pick up more content and less code.

    Imagine that you have 3 columns table on your page. When you see the code, you will notice that first come code for your table, and after that it come your content. Positioning your 3 columns using CSS instead of standard inline elements:

    <table width="90%" border="0" cellspacing="0" cellpadding="0">

    <tr>

    <td width="381" height="150" valign="top" bgcolor="FFEDD4">

    My Product

    </td>

    <td height="150" valign="top" bgcolor="FFEDD4">

    When CSS is used, your code might look like this:

    <div id="leftcontent">

    My Product

    </div>

    Again your code is much more clear, and your content is moved on the top of your document, making your HTML page search engine friendly, and reducing your file size.

    Content is one of the most important factors in Search Engine Optimization, and you will benefit with removing the unnecessary code in your HTML and create search engine friendly web page.

    Validate it

    Browser war is far behind us. Reality is that most of the people today use Internet Explorer, but you should try to be on safe side and ensure that your CSS code is valid. Not all browsers interpret the CSS on same way. You can validate your CSS here: http://jigsaw.w3.org/css-validator/

    Article Source: http://EzineArticles.com/?expert=Zoran_Makrevski

    Friday, July 23, 2010

    7 CSS Layout Tips

    The most difficult thing in CSS to get right is the layout of your site. Here are a couple of tips dealing just with that. Some of these tips are not exactly new, or rocket science, but hopefully they will save someone a bit of bother somewhere!

    Tip 1 : Clear out the default padding and margin settings before you start working.

    Different browsers have different default margin and padding sizes so you want to start with a clean slate, so to speak. Use this command:

    *

    {

    margin: 0;

    padding: 0;

    border: 0;

    }

    to clear all default margin and padding settings. Also note the border, which is set to 0. Please note that if you do this, you will also get rid of the pesky purple border round click-able images, although some people argue that the purple border is necessary for accessibility and usability. But lots of people do not like the purple border round images, and this is one way that you can get rid of it in one fell swoop without having to set img border=0 for each image (which is against the strict markup rules in any case).

    Tip 2 : To center your layout, use a container div to contain all your content

    Declare it as follows:

    #container

    {

    margin: 0 auto;

    width: xxxpx;

    }

    There are a couple of points here to take note of. DO NOT declare the width to be 100%. This defeats the whole object since you will just have to declare the sub elements within the container and then center THEM using margin : 0 auto. This is VERY BAD since it means that instead of declaring the central layout once, you will have to declare it in multiple places for each element within your container.

    Tip 3: Work from the top down

    Literally start working on your CSS layout starting from the top most elements in your design, as well as the 'top' elements in your HTML, such as the body, as well as your main containers.

    Declare your CSS commands on the highest level possible and try and declare something once only and let it cascade throughout. Only override the commands at a lower level when strictly necessary. This prevents a verbose CSS file that is difficult to maintain and understand. For example, if you have { margin : 0 auto} settings on each and every sub div within your container - you are in trouble.

    Tip 4 : Document what you are doing and use Firebug and the Firefox browser to debug

    You are not writing your CSS code just for yourself, some day some poor sod will have to debug it. Make numerous comments inside your CSS file to explain why you are doing things in a specific way.

    Fitting in with this, you might find yourself having to fix someone else's CSS more often than you think (or even your own, for that matter). Use the Firebug add-on for Firefox to debug your CSS. This is a life-saver with regards to giving you an insight into exactly where your design might be broken and why.

    The only problem with this is that your design might work perfectly in Firefox, but not in IE5, IE6 or IE7. This brings us to the next tip.

    Tip 5 : Decide which browsers you are going to build your CSS for and test from the start

    Some purists insist on making sure that your website work for all possible browsers, others only make it work for the 'major' browsers. How do you know exactly which browsers are used the most? Once again W3 Schools come to the rescue.

    On the following page, you can see which browsers are the most popular: http://www.w3schools.com/browsers/browsers_stats.asp. From this page you can see that something like IE5 is only used by about 1.1% of browsers. It is up to you whether you consider it worthwhile to build your CSS to be compatible with this browser, or whether you are just going to test your compatibility with IE6, IE7 and Firefox, for example. Whatever you do, when you start building your CSS, start from the top, and test each and every setting in each of the browsers as you go along. There is nothing worse than building a perfect website in Firefox, then finding out right after you have coded a 1000 line css file that it is broken in IE6. To then debug and fix your code after the fact is a nightmare.

    Tip 6 : Here is an embarrassing little tip for fixing your CSS in IE6 or IE7

    Let's say your design works perfectly in Firefox, but is broken in IE6. You cannot use Firebug to determine where the problem might be since it WORKS in Firefox. You do not have the luxury of using Firebug in IE6, so how do you debug an IE6 or IE7 stylesheet? I often found that it helps to add {border : 1 px solid red} or {border : 1 px solid purple} to the problematic elements. This way you can often see why certain elements do not fit into the space available. It is an embarrassing little tip since it is so primitive and simple, but it works!

    Tip 7 : Understand floats

    Floating of elements is essential to understand, especially in the context of getting your floated elements to work in the different browsers!

    Basically elements such as divs are floated to the left or the right (never to the top or the bottom, only sideways). Here are a couple of things to take into consideration with floated elements. Each floated element must have an explicit width specified. If you are making use of floated divs to create a 3 column or a 2 column layout, rather specify the widths in terms of percentages rather than fixed widths, and if you do use percentages, make sure that the percentages do not add up to 100%, this will often cause the right most column to drop below the rest, clearly indicating that you are trying to fit something into the available space that is too wide for it. Rather use percentages that add up to slightly below 100%, such as 25%, 49%, 24% for a left column, middle column and right column.

    Floating elements can be extremely complex to understand and it is worth while to spend some time on good sites that provide specific guidelines and tips, such as the Position Is Everything website.

    Conclusion

    These CSS tips for layout should hopefully save you some time and effort when you next have to panel-beat a table-less design into submission!

    Article Source: http://EzineArticles.com/?expert=Christine_Anderssen